Network pivoting is a technique used by hackers to access parts of a network that aren't directly connected. Once a hacker gains access to one device, they use it to access other devices on the network that the first device couldn't communicate with. It's kind of like using a foothold in one area to leapfrog into another area that was originally out of reach.
In this guide we'll review how to pivot a network using the Chisel application. Chisel is a fast TCP tunnel over HTTP, that can be used to bypass firewall restrictions and access internal networks from the outside. Chisel uses the HTTP CONNECT method to create TCP tunnels, so it works with most HTTP proxies. It is a single executable with no dependencies and can be used for quickly bypassing firewalls in pentesting scenarios. I recently had the opportunity to work in a lab where multiple pivots were necessary, and Chisel made accomplishing this task easy. The Chisel network pivoting tool allows for the creation of secure tunnels over HTTP by utilizing the SSH Protocol.
Now we'll walk you through the steps of how to effectively pivot a network using Chisel. I have drawn a mock network using a Kali Linux attacker machine and Windows hosts as the victim machines. I will demonstrate the commands to make two pivots: the first pivot will be in the DMZ subnet, and the second pivot will be into the Internal network. Let's dive in and learn how to pivot a network using Chisel!
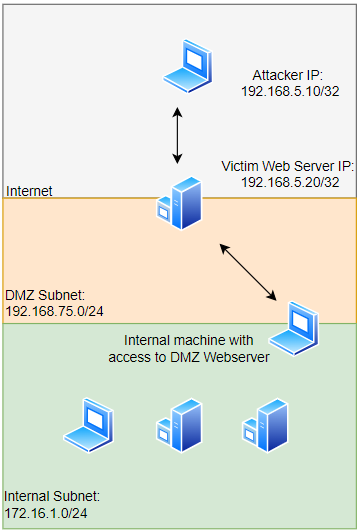
We'll assume that we have compromised the victim web server and now want to use it as a stepping stone to move laterally through the organization's network. In order to see the other machines located in the DMZ subnet, we will use the compromised web server as our initial pivoting point.
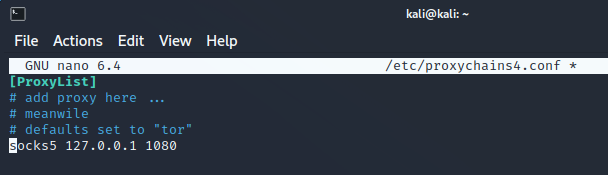
First, lets configure the proxy server on our Kali Linux machine by using port 1080 as our SOCKS5 proxy port. We will add this configuration to the bottom of the proxychains4.conf file.
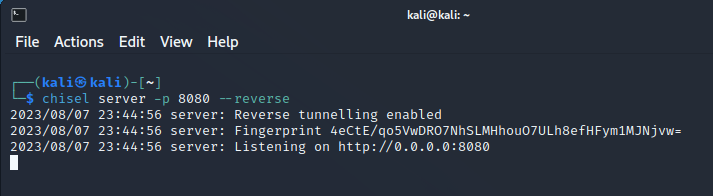
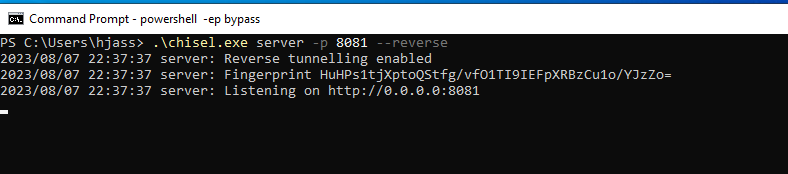
Next, we need to start the reverse Chisel server on our Kali machine and set it to listen on port 8080:
The Chisel Server command structure is as follows:
chisel server -p <server_port> --reverse
- server: This is the subcommand used to start the Chisel server.
- -p <server_port>: This specifies the port on which the Chisel server will listen for incoming client connections.
- --reverse: This option is used to enable reverse connections, allowing clients to initiate connections to the server.
Now, we need to upload the Chisel application to the victim machine. It's important to run the same version of Chisel on both the server and client. You can upload the application using any method you prefer, but for this guide, we'll use a Python 3 HTTP server and Chisel version 1.7.3. When downloading Chisel, ensure that you select the appropriate machine type. In this case we will pivot on a Windows machine, so we need the 'chisel_1.7.3_windows_amd64.gz' file.
(Note: Windows Defender will detect 'chisel.exe,' so you should utilize a packer if you need to bypass Defender. You can use a packer like AtomPePacker found at this link: https://github.com/NUL0x4C/AtomPePacker).
To upload Chisel to our victim Windows machine, we'll set up a Python HTTP server in the directory containing our Chisel.exe file.

Next, we'll download the file to our Windows machine using PowerShell.

The last step is to start the Chisel client on our Windows machine.

The proper command structure for the Chisel client is as follows:
chisel client <remote_domain>:<remote_port> <local_port>
- client: This is the subcommand used to establish a client connection to the Chisel server.
- <remote_domain>:<remote_port>: This specifies the domain and port of the Chisel server you want to connect to.
- <local_port>: This specifies the local port on your machine that will be forwarded to the Chisel server.
Now, we can use our proxy server to enumerate hosts on the DMZ network:

To configure your web browser to use the proxy server, you can use an extension called FoxyProxy. FoxyProxy is available for Firefox and can be downloaded from the Firefox add-ons store and will be configured like this:

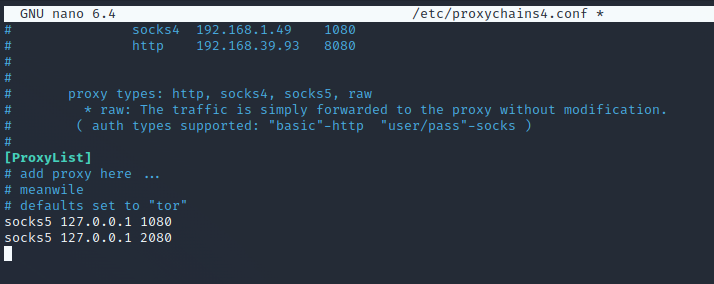
When we discover a new target machine that grants us access to another segment of the network, we can repeat the steps by adding a second chain to Proxychains. We add a second entry to our proxychains4.conf:
Next we'll set up the a Chisel server on our compromised web server, we need to open a second window and create the server.
We need to download and configure the Chisel client on our new target machine that has access to another segment of the network. Here are the steps to follow:

Now we can enumerate the next segment of the organizations network.
In today's digital world, cyber threats are an ever-present danger. Protecting your data and infrastructure has never been more critical. For affordable and comprehensive cyber security solutions, contact Bokeh Solutions today, our team of experts are standing by to address your needs and provide an unparalleled level of protection. I hope this tutorial was helpful, thanks for reading. If you have any questions feel free to drop us an email at
References:
Chisel : https://github.com/jpillora/chisel/releases/tag/v1.7.3
Kali Linux : https://www.kali.org/get-kali/#kali-platforms
Windows 10 - https://www.microsoft.com/en-us/evalcenter/evaluate-windows-10-enterprise
Great Article for building an AD Lab - https://robertscocca.medium.com/building-an-active-directory-lab-82170dd73fb4